I’ve previously used “Individual User Accounts” authentication for authenticating users in web applications but as the management of users in the underlying SQL databases isn’t that simple it seemed that using Azure Active Directory to manage users might be a better option.
The first step in the process is to create an “Azure Active Directory B2C” directory in your subscription.
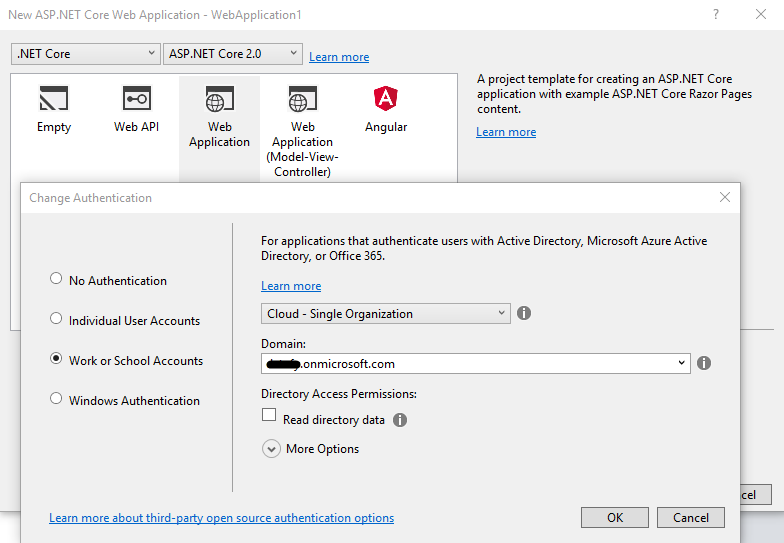
Once the directory has finished deploying create a new ASP.NET Core Web Application and for Authentication choose “Work or School Accounts”, the domain of the B2C directory you just created will now be selectable under the “Domain” drop down, select it and then create your project.
Creating the project will also create a new Application in the “Azure Active Directory” section of your new directory, you can switch directory by clicking the account section in the top right of the Azure portal and choosing the desired directory.
Once in the directory go into the “Azure Active Directory” blade and select the “Enterprise applications” blade, within this select your application (to see all user created applications click on the “Total apps” text).
To allow users to use an application they need to be invited through the “Users and groups” blade. Select “Add user” and then “Users”, you can then invite any email that has a Windows Live login.
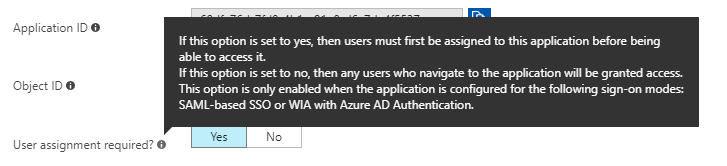
After the required user invitations have been sent, go back up to the created application in the “Enterprise Application” blade and select “Properties”. By default once a user has accepted an invitation they will have access to all applications in the directory, even if they weren’t added to any of the other applications, this seems like a terrible idea and in order to prevent users accessing applications you don’t want them to the “User assignment required?” option should be turned on.
If you now run the application localy you will be presented with the Microsoft login screen where you can login with an either the credentials of that you used to set this up in the Azure portal or those of an invited user.
Although this all now appears to work there’s a couple more things that need to be setup before the web application is ready to be deployed.
First off, when the application was created in “Azure Active Directory” the reply URL that a user is redirected to after login is set to be the local URL (e.g. https://localhost:44329/signin-oidc), if you actually want to deploy the application to Azure you’ll need to add a reply URL that points to your site. This can be done in “Azure Active Directory” > “<YOUR APPLICATION NAME>” > “Reply URL’s”.
Update
Authentication failures seem to now be taken care of in the MS login portal rather than being handed back to your application to deal with and the below files are no longer created as part of the scaffolding process in the project. This can probably be ignored unless you’re creating an application from an older version of Visual Studio.
Secondly, if a user trys to login and they haven’t been granted access to the application the login will fail as expected but they’ll be redirected back to the web application which will then trow an error as it doesn’t know what to do in the case of login failure events. This produces a rather unhelpful error like that below.
An unhandled exception occurred while processing the request.

OpenIdConnectProtocolException: Message contains error: 'access_denied', error_description:
'AADSTS50105: The signed in user is not assigned to a role for the application ''.
Trace ID: 8fa9c12f-f95a-422a-9545-0a5477a77c00
Correlation ID: 8ed28cbe-143a-4532-b2df-1a449b5e9690
Timestamp: 2017-12-13 17:21:04Z', error_uri: 'error_uri is null'.
In order to handle these “access_denied” exceptions you need to update the AddAzureAd method in the AzureAdAuthenticationBuilderExtensions class in the Extensions folder of your project to the following.
public static AuthenticationBuilder AddAzureAd(this AuthenticationBuilder builder, Action<AzureAdOptions> configureOptions)
{
	builder.Services.Configure(configureOptions);
	builder.Services.AddSingleton<IConfigureOptions<OpenIdConnectOptions>, ConfigureAzureOptions>();
	builder.AddOpenIdConnect(options => {
		options.Events = new OpenIdConnectEvents
		{
			OnRemoteFailure = context => {
				context.HandleResponse();
				context.Response.Redirect("Account/AccessDenied");

				return Task.FromResult(0);
			}
		};
	});

	return builder;
}
This handles any remote access failure from the login attempt and redirects it to the pre-created AccessDenied.cshtml page, unfortunatly this page has an error in it as well and the title header ViewData should be prefixed with an “@” symbol to ensure it is processed by the razor engine.
<h1 class="text-danger">@ViewData["Title"]</h1>
0 Comments